---
title: How to Create a Call for Heat Automation to Control Your Heating
description: This article provides a comprehensive, step-by-step guide on setting up a "Call for Heat" automation within the Lightwave app, ensuring a seamless process for users looking to optimize heating efficiency and streamline temperature management.
---
[Skip to content](https://support.lightwaverf.com/knowledge/how-to-create-a-call-for-heat-automation-to-control-your-heating#main-content)
Open main navigation
Close main navigation
- [WhatsApp: +44 7480 784990](https://wa.me/+447480784990)
[WhatsApp: +44 7480 784990](https://wa.me/+447480784990)
How can we help you?
- There are no suggestions because the search field is empty.
1. [Help Center](https://support.lightwaverf.com/knowledge?hsLang=en)
2. [What do I need? & System Setup](https://support.lightwaverf.com/knowledge/what-do-i-need-system-setup?hsLang=en)
3. [Heating](https://support.lightwaverf.com/knowledge/what-do-i-need-system-setup?hsLang=en#heating)
# How to Create a Call for Heat Automation to Control Your Heating
## This article provides a comprehensive, step-by-step guide on setting up a "Call for Heat" automation within the Lightwave app, ensuring a seamless process for users looking to optimize heating efficiency and streamline temperature management.
**A Call for Heat automation links your thermostats and TRVs to your Boiler Switch during initial setup. Once configured, your thermostats and TRVs can automatically turn the boiler on or off based on whether they need heat.**
1. **Launch** **the Lightwave Link Plus app.**
You will be taken to your Favourites page.
-jpg.jpeg?width=204&height=441&name=Image%20(12)-jpg.jpeg)
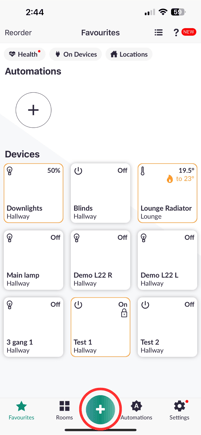
2. **Access** **the Automation Menu.**
Tap the green plus (+) icon at the bottom centre of the screen, then select "Automations".
-png.png?width=203&height=440&name=Untitled%20design%20(1)-png.png)
3. **Select "Call for Heat".**
Choose "Call for Heat" from the list of available automations.
-png.png?width=199&height=431&name=Untitled%20design%20(2)-png.png)
4. **Configure Callers.**
When prompted, select the devices that will call for heat — for example, your TRVs or thermostats. Tap "Next" in the top-right corner to continue.
-png.png?width=216&height=468&name=Untitled%20design%20(3)-png.png)
5. **Configure Providers.**
Select the devices that will provide heat — for example, your Boiler Switch or Relay. Tap "Next" in the top-right corner to continue.
-png.png?width=220&height=476&name=Untitled%20design%20(4)-png.png)
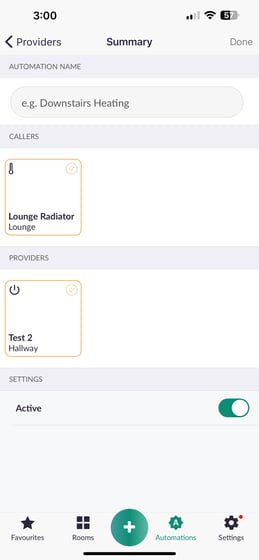
6. **Finalize the Automation.**
Enter a name for your automation, then tap "Done" in the top-right corner to complete the setup.
7. 
If you continue to experience issues, please contact our support team at
0121 468 8987
(option 2). Support is available Monday–Friday, 9 am–5 pm GMT.
- [What do I need? & System Setup](https://support.lightwaverf.com/knowledge/what-do-i-need-system-setup?hsLang=en#main-content)
- [Getting started on the Lightwave App](https://support.lightwaverf.com/knowledge/what-do-i-need-system-setup?hsLang=en#getting-started-on-the-lightwave-app)
- [Lighting](https://support.lightwaverf.com/knowledge/what-do-i-need-system-setup?hsLang=en#lighting)
- [Heating](https://support.lightwaverf.com/knowledge/what-do-i-need-system-setup?hsLang=en#heating)
- [Automations](https://support.lightwaverf.com/knowledge/what-do-i-need-system-setup?hsLang=en#automations)
- [Third Party Integrations](https://support.lightwaverf.com/knowledge/what-do-i-need-system-setup?hsLang=en#third-party-integrations)
- [FAQ's](https://support.lightwaverf.com/knowledge/what-do-i-need-system-setup?hsLang=en#faqs)
- [Advanced Features](https://support.lightwaverf.com/knowledge/what-do-i-need-system-setup?hsLang=en#advanced-features)
- [App Guidance & Automations](https://support.lightwaverf.com/knowledge/app-guidance-automations?hsLang=en#main-content)
- [My Account](https://support.lightwaverf.com/knowledge/app-guidance-automations?hsLang=en#my-account)
- [App Guidance](https://support.lightwaverf.com/knowledge/app-guidance-automations?hsLang=en#app-guidance)
- [Automations](https://support.lightwaverf.com/knowledge/app-guidance-automations?hsLang=en#automations)
- [Troubleshooting](https://support.lightwaverf.com/knowledge/troubleshooting?hsLang=en#main-content)
- [General](https://support.lightwaverf.com/knowledge/troubleshooting?hsLang=en#general)
- [Lighting](https://support.lightwaverf.com/knowledge/troubleshooting?hsLang=en#lighting)
- [Heating](https://support.lightwaverf.com/knowledge/troubleshooting?hsLang=en#heating)
- [Power](https://support.lightwaverf.com/knowledge/troubleshooting?hsLang=en#power)
- [Automations & Hub](https://support.lightwaverf.com/knowledge/troubleshooting?hsLang=en#automations-hub)
- [Installation Guides](https://support.lightwaverf.com/knowledge/installation-guides?hsLang=en#main-content)
- [Link Plus Hub](https://support.lightwaverf.com/knowledge/installation-guides?hsLang=en#link-plus-hub)
- [Lighting](https://support.lightwaverf.com/knowledge/installation-guides?hsLang=en#lighting)
- [Power](https://support.lightwaverf.com/knowledge/installation-guides?hsLang=en#power)
- [Relays](https://support.lightwaverf.com/knowledge/installation-guides?hsLang=en#relays)
- [Heating](https://support.lightwaverf.com/knowledge/installation-guides?hsLang=en#heating)
- [Connect Series Support Archive](https://support.lightwaverf.com/knowledge/connect-series-support-archive?hsLang=en#main-content)
- [General](https://support.lightwaverf.com/knowledge/connect-series-support-archive?hsLang=en#general)
- [Lighting](https://support.lightwaverf.com/knowledge/connect-series-support-archive?hsLang=en#lighting)
- [Heating](https://support.lightwaverf.com/knowledge/connect-series-support-archive?hsLang=en#heating)
- [Power](https://support.lightwaverf.com/knowledge/connect-series-support-archive?hsLang=en#power)
- [Contact Us](https://support.lightwaverf.com/knowledge/contact-us?hsLang=en#main-content)
- [Product Returns](https://support.lightwaverf.com/knowledge/contact-us?hsLang=en#product-returns)
- [Contact Us](https://support.lightwaverf.com/knowledge/contact-us?hsLang=en#contact-us)
[-1.png?width=58&height=24&name=Lightwave%20Logo%20Green%20Small%20(320%20x%20132)-1.png "Chill listening crop-3")](http://lightwaverf.com)
[mailto:email@email.com](mailto:email@email.com)
Copyright © 2025, Lightwave